To add to the flexibility of the Little Reader program, we have added the Print function, which allows you to print your flash cards so you can have hardcopies which you can use anywhere and everywhere!
With the Print Function, you can choose the pictures, fonts and colors that will be printed on your flash cards.
For best results, use a color printer and A4-sized paper for your printouts.
Choose the words you want to print from the leftmost panel in the Print Screen.
2. Select a print layout and content type
Use the Full Sheet Prints layout with Word and Picture content.
3. Choose your word and picture prints options
You can use the RANDOMIZE button to automatically assign font types and colors to your word prints or pick the image files for your picture prints. To preview how your flash cards would look like with your print settings applied, click on the PREVIEW button at the bottom of the Print Screen.
4. Click the 'Print' button to start printing
To set your printing preferences, click on the SETTINGS button (located below the PREVIEW button).
5. Sort your printouts
Sort your printouts so that each word is paired with the corresponding picture, printed sides out.
6. Seal the empty side of your flash cards
Glue the word prints to the picture prints so that each word is on one side of the flash card and the picture is on the other side.
TIP: Dry glue is recommended for sealing flash cards.
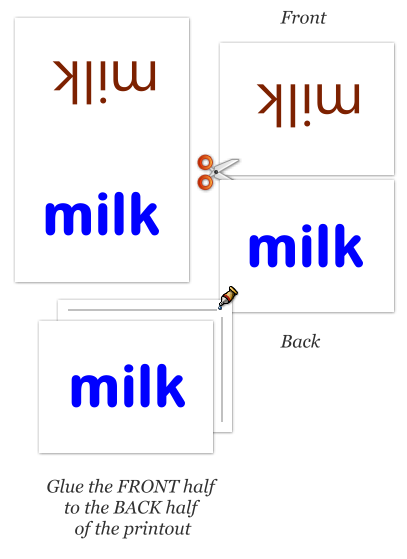
1. Choose the words you want to print.
Choose the words you want to print from the leftmost panel in the Print Screen.
2. Select a print layout and content type
Use the Half Sheet Prints (Word & Picture separate) layout with Word Only content.
3. Choose your word prints options
You can use the RANDOMIZE button to automatically assign font types and colors to your word prints. To preview how your flash cards would look like with your print settings applied, click on the PREVIEW button at the bottom of the Print Screen.
4. Click the 'Print' button to start printing
To set your printing preferences, click on the SETTINGS button (located below the PREVIEW button).
5. Cut and sort your printouts
Cut your printouts in half and sort them so that two versions of the same word are paired together, printed sides out.
6. Seal the empty side of your flash cards
Glue the two halves together so that both sides of the flash card show one of the printed words.
TIP: Dry glue is recommended for sealing flash cards.
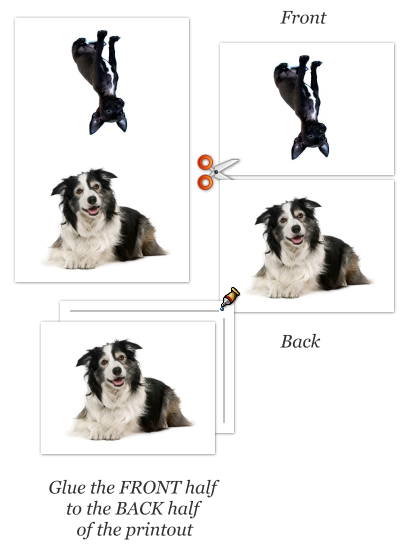
1. Choose the words you want to print.
Choose the words you want to print from the leftmost panel in the Print Screen.
2. Select a print layout and content type
Use the Half Sheet Prints (Word & Picture separate) layout with Picture Only content.
3. Choose your word prints options
You can use the RANDOMIZE button to automatically assign font types and colors to your word prints. To preview how your flash cards would look like with your print settings applied, click on the PREVIEW button at the bottom of the Print Screen.
4. Click the 'Print' button to start printing
To set your printing preferences, click on the SETTINGS button (located below the PREVIEW button).
5. Cut and sort your printouts
Cut your printouts in half and sort them so that two images of the same word are paired together, printed sides out.
6. Seal the empty side of your flash cards
Glue the two halves together so that both sides of the flash card show one of the printed words.
TIP: Dry glue is recommended for sealing flash cards.
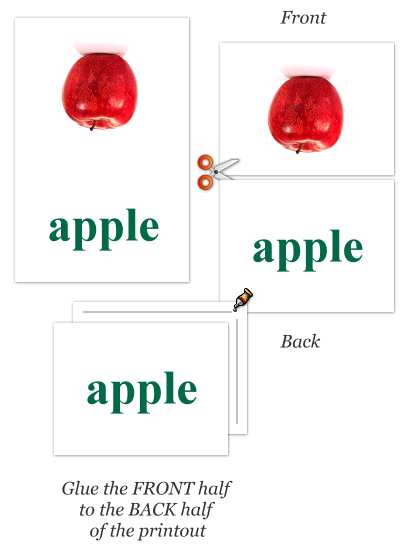
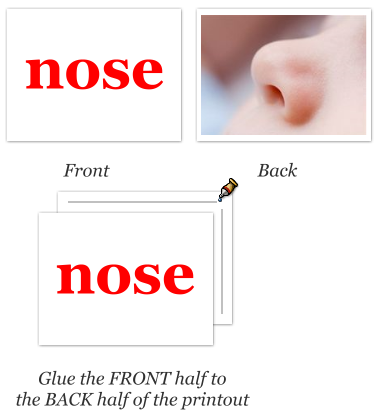
1. Choose the words you want to print.
Choose the words you want to print from the leftmost panel in the Print Screen.
2. Select a print layout and content type
Use the Half Sheet Prints (Word & Picture together) layout with Word and Picture content.
3. Choose your word prints options
You can use the RANDOMIZE button to automatically assign font types and colors to your word prints or pick the image files for your picture prints. To preview how your flash cards would look like with your print settings applied, click on the PREVIEW button at the bottom of the Print Screen.
4. Click the 'Print' button to start printing
To set your printing preferences, click on the SETTINGS button (located below the PREVIEW button).
5. Cut and sort your printouts
Cut your printouts in half and sort them so that each word is paired with the corresponding picture, printed sides out.
6. Seal the empty side of your flash cards
Glue the two halves together so that both sides of the flash card show one of the printed words.
TIP: Dry glue is recommended for sealing flash cards.
Tick this option to print out a cover sleeve for each category of flash cards. You may customize the cover by typing in the title name you want, in the font type and color you've selected. You can then store your flash cards in an organized manner when they are not in use.