Can babies learn how to read?
They CAN, they DO & they LOVE TO!
![]()
by
![]()
Ideal for babies and young children, Little Reader is the most effective learning system for teaching your child to read.
At its heart is a revolutionary software system that delivers lessons in ways never before possible, making learning FUN for your child, and EASY for you.


We got together a group of parents as part of our Testimonials Project, and these are the top benefits they reported:
The first thing that the parents noticed was that their child's vocabulary dramatically increased. Little Reader helps to achieve this through its built-in curriculum that includes thousands of words in over 180 subject categories, which are used in single words, couplets, phrases, sentences and full stories.

Following an increased vocabulary, many also noticed more and better communication. Little Reader helps to do this with the different professionally recorded voices that enunciate words clearly, and by encouraging interaction with the child.

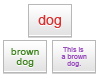
Learning to read words is something that many parents have reported, especially where the child has finished the one-year curriculum in Little Reader. Little Reader starts by teaching whole-word recognition, and gradually fostering phonetic awareness through the Pattern Phonics™ system. Find this hard to believe? Watch the many videos of babies and toddlers reading with Little Reader!
And that's not all! Parents also witness their child loving the program and having fun, as well as having an increased desire to learn.
Parents report that not only does their child benefit, they benefit too!

Parents often talk about the pride they feel in being the first one to teach their child, and the joy in witnessing their child making great strides as they not only learn to read, but learn about the world around them.

The most treasured experience from using Little Reader that parents report is the bonding that inevitably happens between parent and child. Even fathers who otherwise felt 'left out' in those first one or two years report being able to share intimate bonding experiences with their child through Little Reader.

The easiest way for you to teach.
A pre-planned 1-year curriculum removes any need for you to think about what you should teach your child each day. All you need to do is press 'PLAY' and have fun interacting with your child! Lessons are deliberately designed to last approximately five minutes each day to cater to young children's short attention spans and make it easy for you to fit this into your regular daily routine.
Something new to see and hear each day.
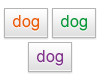
Not only is the lesson content different every day, even the same day's lesson plays back differently each time! Little Reader automatically randomizes and rotates media, and each word file typically comes with 3 recorded voices, 5 images, 2 word commentaries or sound effects and - to help better illustrate things and concepts such as animals, action words and stories - 1-3 videos!

Want to EDIT and CREATE your own lessons? Unleash these FULL editing features by getting a PRO KEY for LITTLE READER!

Take control of the lessons.
Want to give the lessons a personal touch and make it even more engaging for your child? Easily modify the lessons or create your own by using your own voice recordings, photos and videos!
Teach words that are personal to your child (like family names), as well as words specific to your culture or locality!

Download more free content.
Your child's learning isn't just limited to the curriculum - you can choose to download over 5,000 reading lessons in 27 subject categories and more than two dozen languages. Most are available for free, and all can be easily imported into your Little Reader with just a few clicks of your mouse.
 Mia and Greg
former and current 6th Grade English Teachers
"Little Reader should be in everybody's home."
Watch the video
Believe in our products? Recommend them to others and earn a commission!
Learn more.
Can young children really be taught math, music or to read? and if they can, should they? Find out more with these eBooks.
We're convinced Little Reader is so effective, we guarantee that you will very satisfied with the product or we'll give you your money back!