

Thank you for using Little Reader!
Whether you have purchased Little Reader or you are just trying it out, please spend a brief moment to run through this Beginner's Tutorial so that you and your child may get the most out of Little Reader.
If you've never seen a baby reading before, you can see dozens of reading babies on the Baby Reading Videos page at brillbaby.com, including my own daughter Felicity reading at 12 months. You can also see many babies reading using Little Reader at our Little Reader Video Testimonials page.
We also recommend that you familiarize yourself with knowledge on teaching babies to read by going through our Teaching Your Baby To Read booklet, which you may find in your purchased boxset or download here. This booklet will answer questions such as, "Why teach reading early?", "How do you teach babies to read?", and "What about phonics?".
If you're ready to begin using the software, just click on the NEXT button below to continue with this Beginner's Tutorial!
Happy teaching!

KL Wong
Founder, BrillKids

You have already successfully installed the Little Reader software.
As soon as you install Little Reader, you can start taking Little Reader for a test drive. The software comes with starter content which includes the first 9 days of the English curriculum, and you can use Little Reader's PRO features (full suite of lesson editing options) for a 14-day trial period.
If you have a Little Reader license key, you should do the following if you have not already done so, in the following order:
If you purchased online, an account will have been created for you already. If you don't have an account yet, you can create a BrillKids Account here.
Click here to learn how to create a BrillKids Account
If you purchased a box set, the license key is included in your Software CD box.
Click here to learn how to import your license key from your CD box
If you purchased your product online, you may obtain your license key from your Account Management page.
If you purchased a box set, please insert the CD-Rom discs contained in your Curriculum Content CD box.
Click here to learn how to import your curriculum content from your CD-Rom
Note: If your box set came with a DVD-Rom labeled "Software + Content" you would have installed your Little Reader software with your full curriculum pre-loaded already.
If you purchased your product online, you may download your curriculum content from your Account Management page.
For support regarding setting up your Little Reader, please see our Help Desk.
The Little Reader curriculum is a 1-year curriculum (made of two 6-month Semesters) which gradually leads your child from learning single words, to couplets, phrases, sentences, and finally, full stories. Curricula in other languages such as Spanish, French, Thai, Russian and Chinese are also available for separate purchase as an add-on for your Little Reader lesson library.
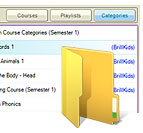
The easiest way to start playing your lessons is from the PLAY COURSES screen. Follow these steps to start playing your Little Reader course lessons:
1. Click on the PLAY COURSES button in Little Reader.

2. Select the semester you want to play from the list of Available Courses.

3. Choose the lesson day you want to play, starting from Day 001 Lessons.
![]()
4. Press the big PLAY button.

To see what is contained in a day's lessons, double-click on the Day's folder. You will see that each day is made up of 2 sessions:
> Session 1
> Session 2
Each Session is made up of different types of lessons. During the 12 month curriculum, you will come across these types of lessons:
> Picture Flash

> Multisensory
> Pattern Phonics™
> Sight Words

> Word Split
> Story Time

> Games

Note: The lesson types listed above applies to the English curriculum. Other language curricula may vary.
For more about the different types of lessons, see the next section (4. More About Each Lesson Type).
The curriculum is designed to be played 5 days a week, once or twice a day. Each session only needs to be played once.
You may find it convenient to play Session 1 in the morning, and Session 2 in the evening. Many working parents like playing Session 1 before leaving for work, and Session 2 after returning from work, from Monday to Friday, and either taking a break during the weekends, or using that time to catch up on any missed days. If you only have time to play one session a day, choose either Session 1 or Session 2, alternating between the two if you can.
The most important thing to remember is to interact with your child. Here are some ideas:
Before you start the lessons with your child, it is useful to know a bit more about each lesson type, how they work and how they are supposed to be played.
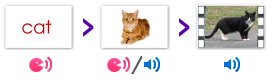
These lessons simulate the flashing of pictures to your child and is useful for consolidating her understanding of the meaning of the words. Shown in 'flash' style, the slides are auto-forwarded. The pictures of all the words shown in the multisensory lesson are flashed here.
This method works by involving as many of your child's senses as possible. The most important thing to remember here is to interact with your child as much as possible. Let your child not only see the word and hear the word, but also feel the word whenever appropriate. For example, help her clap her hands for the word 'clap', rub her ear for the word 'ear', and let her point to yellow objects for the word 'yellow'. If you can engage the sense of smell and taste too, then even better!
The lessons are set to be manually forwarded (either by clicking on the mouse or pressing the spacebar), so take as much time as you need. Where appropriate, run your finger under the words as the words are read, to indicate the direction of reading.
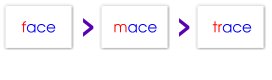
Pattern Phonics™ lessons are used to give your child an intuitive understanding of the sounds of letters and how words can be broken up into different parts. This is done by showing a series of words grouped together in a coherent way for example, words beginning with 'b') and color-coding the words to make the patterns obvious.
Lessons are delivered like word flash lessons – fast and auto-forwarded.
These lessons use the flash method, which involves rapid flashing of words to your child. This method takes advantage of your child's right-brain ability to absorb large quantities of information rapidly.
These lessons simulate physical flash cards being flashed rapidly to your child. The lessons here are set to be auto-forwarded so you only need to let your child watch them.
Sight Words lessons show words from the Dolch word list which mainly comprises words that were commonly found in children's books, many of which are difficult to be sounded out using phonics rules.
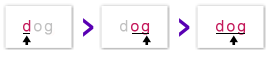
In Word Split lessons, we introduce the concept that words can be split into different parts, and demonstrate how those parts are sounded out. Some lessons split words into syllables, and some into phonemes. These lessons, along with the Pattern Phonics lessons, will slowly help your child to gain phonemic awareness.
From semester 2 onwards, your child will be shown complete stories. Prior to this in semester 1, your child will have already been shown many words which make up the stories.
These lessons require you to advance the slides manually, so like the multisensory lessons, take your time to engage your child in the story and interact with her.
These lessons will present multiple words or pictures on the screen, and ask your child to identify the correct one (eg., "which one is 'dog'?"). In Auto mode, the number of choices for a particular word will increase each time a correct guess is made, and vice versa. Click on whichever choice your child makes, even if it is not the correct one.
Most importantly, remember to treat this as a fun game and not turn it into a test!

Want to EDIT and CREATE your own lessons? Unleash these FULL editing features by getting a PRO KEY for LITTLE READER!
One of the best ways to engage your child's attention is by customizing the content that you show her.
One of the first things you are encouraged to do is to edit the "Family" Category. For example, you could do the following:
You could even go further and edit the Curriculum Content. For example, instead of using the five pictures we give you for 'nose', you could delete those and pictures of Mommy's nose, Daddy's nose, and your child's own nose! Doing this is optional but highly recommended as it would make your child's lessons much more meaningful.
Once you get the hang of creating content, you can even create entirely new Categories, such as local fruits, or other topics of particular interest to your child.
Click here for information on how to create and edit words.
Apart from creating new content, you could also download literally thousands more content files from our Little Reader Library!
Simply proceed to the Little Reader Library and browse around for categories or playlists that may interest your child, whether in English or in other languages. You can preview the content before downloading, or click on "DOWNLOAD" to have the content automatically downloaded to your computer, ready to be imported into Little Reader!
Downloaded content can be accessed in the Play & Edit screen, under "Categories" or "Playlists."
After downloading or creating more content, you could even insert them into your curriculum, either in place of Categories which she is already familiar with, or in addition to what's already there.

One of the most important things you must remember when teaching your child to read is this:
Focusing on results tends to bring about negative emotions such as anxiety and disappointment, which will be picked up by your child. Similarly, forcing your child is counter-productive and would lead her to associate reading with something negative.
Instead, treat lesson time as a time for bonding with your child. The aim is to expose your child to reading and to have fun while doing so, thereby giving her a joyful and loving experience. Keeping a bonding-focused mindset will make you a much more effective teacher, and you are also likely to find that your child learning to read is a very pleasant side-effect.
Remember, this is not a race! Any exposure to reading that you give to your child during the early years will already be very beneficial.

Apart from keeping the lessons fun and joyful, there are no rules that are set in stone!
For example, we suggest that the curriculum lessons should be played 5 days a week, once or twice a day. Like many of our other suggestions, this is only a guideline. It is there to help you if you choose to use it, not to enslave you.
We always stress that YOU are your child's first and best teacher, because you know your child best. Every child is different, and even the same child may behave differently at different times! What's most important is that you play it by ear and go according to your child's moods as well as your own circumstances, which may change from time to time.
So if are tired and you want to skip a day, no problem! If your child doesn't seem to want to have lessons that day or even that week, that's absolutely fine! If you feel that your child already knows the words, then skip them or remove that category from your curriculum!
Want to EDIT and CREATE your own lessons? Unleash these FULL editing features by getting a PRO KEY for LITTLE READER!
Watch these short video clips to learn more about how to use the Pattern Phonics Flip Cards and the Storybooks!

J. Richard Gentry, Ph.D.
"..the best thing about Little Reader is that it builds positive parent-child social interactions and expands opportunity for the parent and the child to talk and have fun with books, concepts, and words. Everything the parent needs is right there in the kit - just pick it up and interact."
Believe in our products? Recommend them to others and earn a commission!
Learn more.

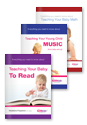
Can young children really be taught math, music or to read? and if they can, should they? Find out more with these eBooks.
We're so convinced Little Reader is so effective, that we guarantee your child will learn the basics of reading after completing the 12-month curriculum, or we'll give you your money back!